Creating your ThruText Campaign
ThruText campaigns allow you to manage and send messages to specific target audiences. Creating a campaign helps ensure messages reach the right people at the right time, whether you're launching a voter outreach effort, a volunteer drive, or a fundraising push. This guide will walk you through the full setup process so you can launch with confidence and clarity.
TABLE OF CONTENTS
- Before Getting Started
- Start a New Campaign
- Campaign Details
- Targeting
- Initial Message
- Senders
- Recommended Replies
- Survey Questions
- Review
- Launching Troubleshooting
- Important Notes
Before Getting Started
Before you launch a ThruText campaign to U.S. numbers, confirm that your account has completed the required 10DLC compliance steps.
- Brand Registration: Register your organization so carriers can identify who is sending your messages. This creates a 10DLC brand for your account, which is required before you can register use cases. For step-by-step instructions, see our guide on Brand Registration.
- Use Case Registration: Register how your organization will use text messaging. Each U.S. campaign must be associated with an approved 10DLC use case. For details, see our guide on Use Case Registration.
Start a New Campaign
You can start a new ThruText campaign from several places in your account. Select the option that matches your current work location, allowing you to proceed directly to the campaign setup steps outlined in this guide.
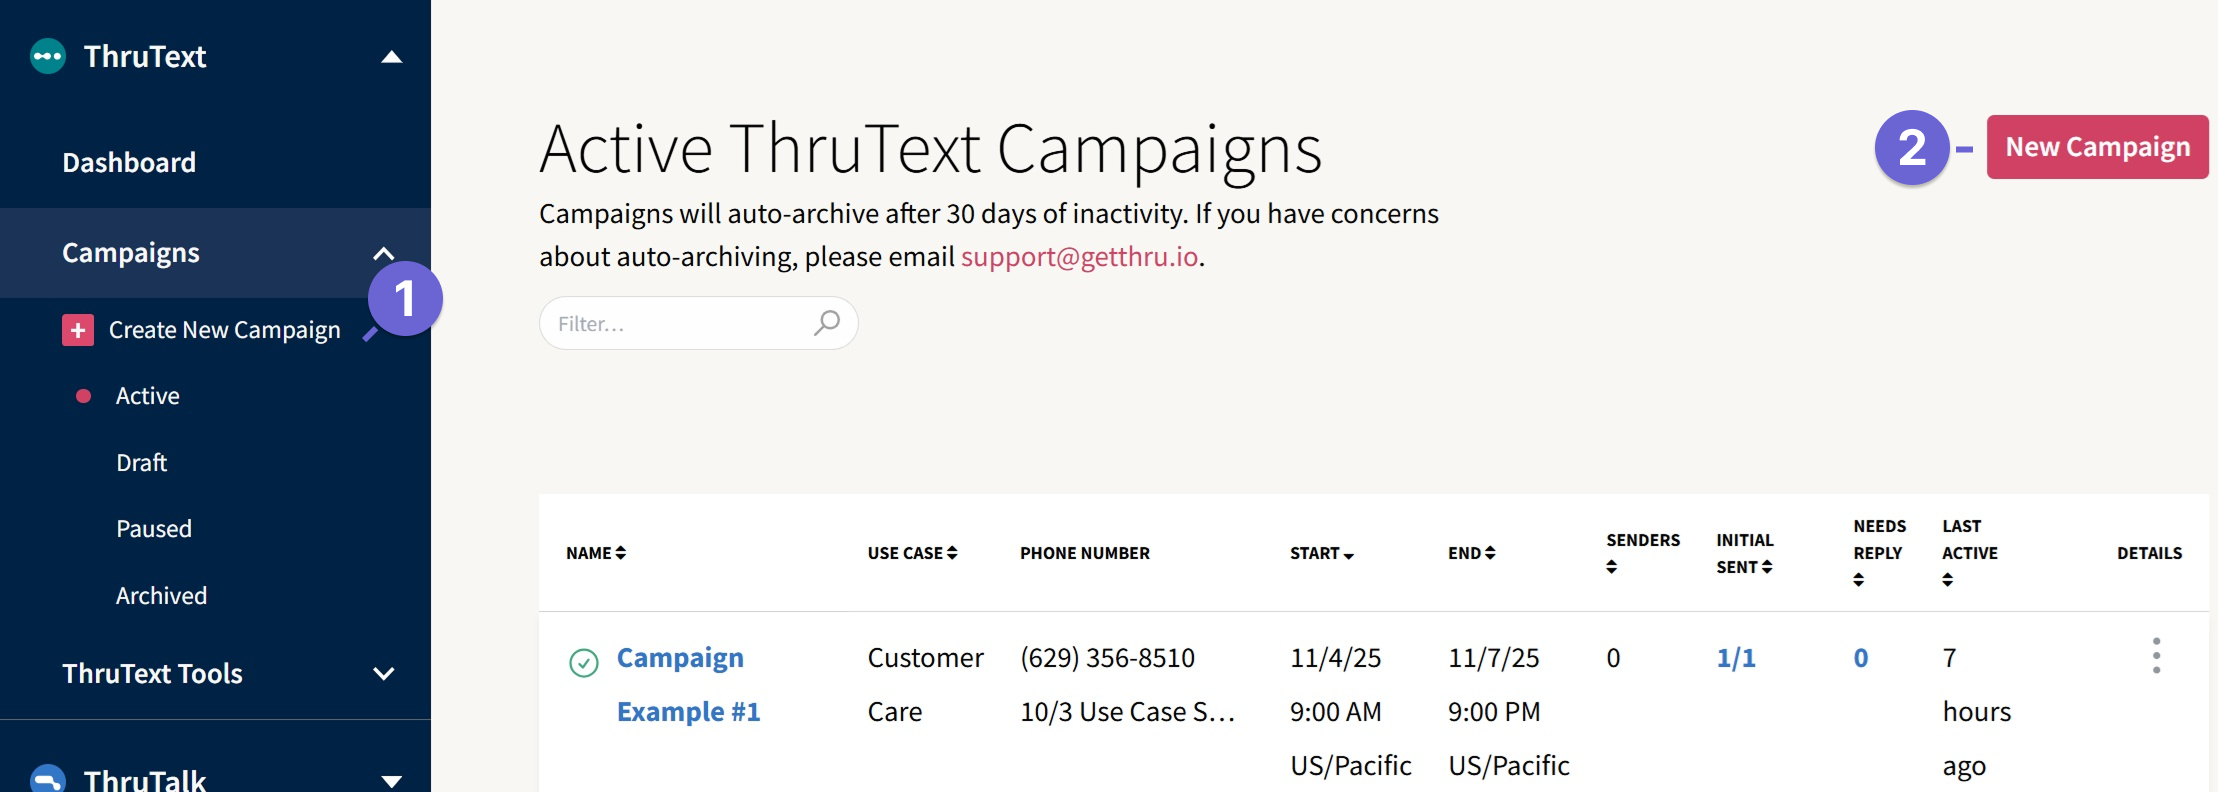
- From the ThruText sidebar: Open the ThruText section in the left sidebar and click Create New Campaign. This takes you directly to the first step of the campaign creation flow.
- From a ThruText Index page: If you’re reviewing your active, paused, draft, or archived campaigns, click New Campaign on the ThruText Index page to create a new campaign without leaving the index. For an overview of the filters and columns on this page, see our ThruText Campaign Index guide.
- From the Admin Dashboard: From the Admin Dashboard, click Create New Campaign in the ThruText section to start a new campaign while you’re viewing account-wide metrics. To learn more about what you can see on this page, see our GetThru Admin Navigation guide.
Campaign Details
When creating a ThruText campaign, you'll start by specifying several parameters:

The Details step includes the following settings:
- Basics
- (A) Name: This campaign name will appear as the assignment name to message senders. We recommend using a consistent naming convention across campaigns for easy tracking.
- (B) Description: The description is visible to message senders and can be used to provide brief instructions or guidance. This is also a great place to let your senders know who to contact if they have assignment questions.
- Dates and Times: The start date and end date control when initial messages can be sent on a campaign. There are important considerations to make when setting the initial message sending window, so we recommend reading our guide for further details about this: Initial Message Sending Window.
- (C) Start Date
- Message senders can view assignments before the start date, but cannot send initial messages until the date arrives.
- Messages can be sent before the start date from the admin messenger, but they will not leave our system until the start date. Users with access to the admin messenger include account owners, admins, and moderators.
- After launching a campaign, the start date can only be edited to a future date.
- (D) End Date
- Message senders can still view assignments after the end date, but only replies or followups can be sent.
- Any messages that were queued due to a rate limit will fail if they have not been sent by the end date. Rate limits are only applicable to US campaigns.
- The end date can be edited after campaign launch.
- (E) Time Zone: The time zone determines the local time for both the initial message sending window and daily send hours. We recommend setting this to where your campaign targets are located, as it will determine when the campaign is open for messaging.
- (F) Daily Open and Close Time: Messages can only be sent in between the daily open and close time each day. Its main purpose is to ensure that text messages aren't sent to contacts during inappropriate hours.
- Set your close time to be after your open time in the same 24-hour period. The system will deliver an error message if the close time is before the start time.
- Senders: After the campaign's close time, but before opening, senders will see the message This assignment is closed in the User Messenger.
- Admins: After the campaign's close time, but before opening, admins will see a message for Campaign is Currently Closed but can still view the conversation thread. If an admin attempted to send a message, it would be queued for the next open hour.
- (C) Start Date
- Tags: Tags can be added to a campaign to help categorize the campaign with certain attributes. This allows admins to create tag reports that contain message and segment totals, grouped by tags. Tags can be added before and after launching a campaign. For more information about tag reports, see our guide: Tag Reports.
Targeting
On the Targeting step, you decide who will receive your campaign and which phone number your messages will come from.
Due to different regulatory frameworks, the Targeting page's Phone Number section will appear differently depending on the account's country. If you're creating a campaign in a Canadian or UK account, please review the following guides, and then skip to the section below for the Initial Message step.

The Targeting step includes the following parts:
- Segments: Use segments to build the audience for your campaign by adding one or more groups or past campaigns. Once you launch, you can’t add or remove segments, so confirm your universe before moving on. To learn more about creating and managing groups, see our guides on Groups. You can use advanced targeting to include or exclude additional segments. Check out our guide Advanced Targeting in ThruText for more details.
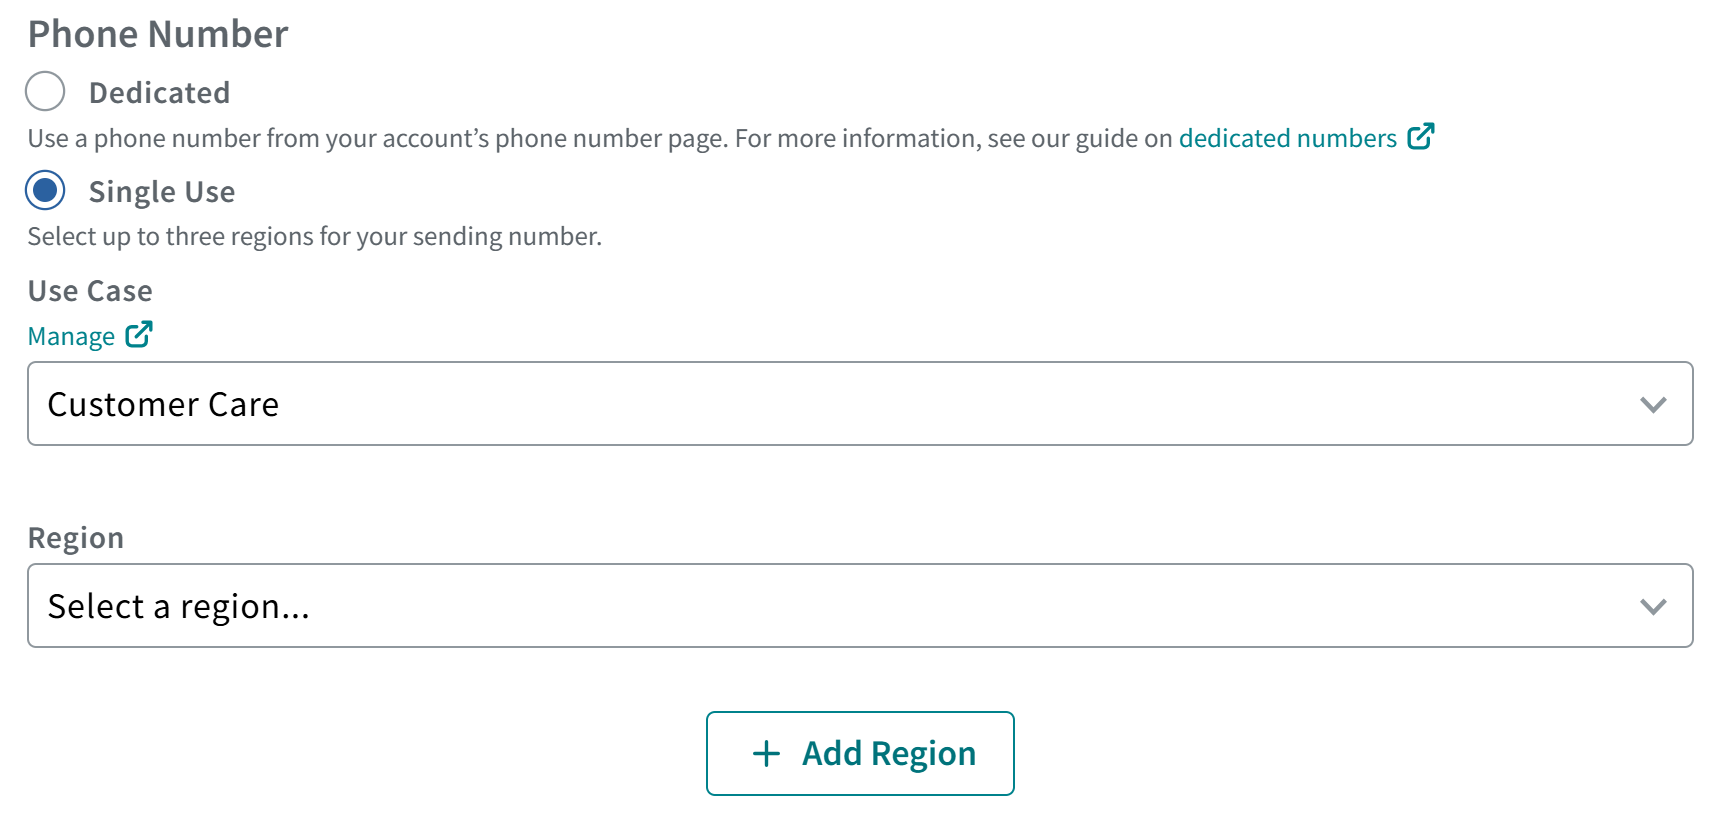
- Phone Number: Choose the sending phone number for your campaign. This is the number contacts will see when they receive your texts. The number attaches to the campaign at launch and is removed when the campaign is archived. You can only complete this step after your Brand and Use Case Registrationis approved.
- Dedicated: Dedicated numbers belong to your account and can be reused across multiple campaigns. They go through provisioning before they are available to use on a campaign, so they allow you to launch campaigns without waiting for a new number to provision. For more about when to choose a dedicated number and how they work, see Dedicated Phone Numbers for US Accounts.
- If contacts are texted from multiple campaigns that use a dedicated number, any replies from the contact will be routed to the most recently launched campaign.
- Single Use: Select Single Use to purchase a campaign-specific number. A campaign that uses a single-use number will remain in the Launching state until that number finishes provisioning. After you choose this option, you’ll see two dropdown menus:
- Use Case: Shows the approved 10DLC use cases you can associate with your campaign.
- Region: Lets you select which area codes or regions to request a phone number from
- Dedicated: Dedicated numbers belong to your account and can be reused across multiple campaigns. They go through provisioning before they are available to use on a campaign, so they allow you to launch campaigns without waiting for a new number to provision. For more about when to choose a dedicated number and how they work, see Dedicated Phone Numbers for US Accounts.
Initial Message
Create your initial message for your campaign and see what the initial message will look like when it is sent.

The Initial Messages step includes the following elements:
- Organization ID: Put your organization name here to identify your organization to your recipient. This is one of the required variables that must be present in every initial message. The value that you input into the freeform will populate when you click Org Name or add %OrgName% to the Message Text. Check out the Organization Name section in our best practice guide.
- Opt Out Language: This required variable lets your recipient know how to opt out and must be present in every message. This value will populate when you click Opt Out or add %OptOut% to the Message Text. Check out the Opt Out section in our best practice guide.
- Custom Fields and Variables: These variables can be added to a message to populate custom data unique to the recipient. Optional variables include name variables as well as any custom variables added by mapping Custom Fields to a group. If every segment in the campaign contains the same custom field, it will be available as an optional variable. See our guide on Using ThruText Custom Fields for more information.
- Add Media: Select media to add to your initial message to change it to an MMS message. You must submit sample media for your use case before this is available.
- Add Trackable Link: You can create a branded trackable URL that you can add to your text message. When a recipient clicks on your link, ThruText will record the click and who it came from. For more information, read our guide here: Trackable Links.
- Message Text: This is where you can compose your initial message. See our guide for best practices on composing an initial message: Text Messaging Best Practices guide.
- Total Segments: This indicates how many segments your text message will be. This is an approximate number because variables in your initial message can make your message longer or shorter, depending on the length of the variables. For more information on message encoding, check out our guide Text Message Segments and Encoding.
- Characters Remaining in Current Segment: This indicates approximately how many characters you have remaining in your message. Initial messages can be a maximum of 9 SMS segments or 1600 character MMS message, but the best initial messages are short and invite conversation!
- When using variables, the segment counter becomes an estimation based on the length of the dynamic variable. This means the sent message may be longer than the counter estimate, depending on the dynamic text length.
- Character Set: This displays the message encoding of the text message based on the message text. Some special characters can change the encoding of the message and increase the segment count of your message. ThruText automatically substitutes some special characters to maintain the industry standard encoding, minimizing segment counts to reduce costs and maximize rate limits.
- Required: This is a checklist of the required message practices when crafting an initial message. These are required to launch a campaign.
- Suggested: This is a checklist of the recommended best practices when crafting an initial message. These are not required to launch a campaign.
- Message Preview: A toggle based preview that demonstrates what your text will look like with or without variable data populated.
- Variable Preview: You can slide this toggle to view example variable data, based on a random selection from the attached segment. If the toggle is active, example data will display as shown in the below image:

Senders
On the Senders step, you choose which people in your account will send messages for this campaign.

The Senders page includes the following elements:
- Choose Senders: Use the search box to find and add the people who will send messages in this campaign. Senders must already have user accounts in your organization. If you need help creating or managing users, refer to our guide How to Invite Users.
- When you add senders at launch, the initial messages will be evenly distributed across the attached senders.
- Campaigns can be launched without senders: If you choose not to add any senders initially, you can still add them after the campaign has been launched. This option is commonly used in conjunction with Self Assign so that senders can request batches of conversations based on the campaign's batch size.
- Chosen Senders: Once you've clicked on a sender from the Choose Senders list, their name will appear in Chosen Senders. Upon launching the campaign, these senders will receive an e-mail notifying them that they have a new assignment, and conversations will be evenly distributed to all senders.
- Add Via Emails: Senders can be added to a campaign by e-mail. Use a comma separated list to add multiple senders at once. Senders added by e-mail will be added after you click Save & Next. Senders can be reviewed in the Review page or by navigating back to the Senders page.
- Self Assignment: Use this feature to set a batch size of conversations and let users assign themselves a batch of conversations upon joining the campaign or when they conclude their current batch. Conversations must be available in unassigned for senders to be able to request conversations. For more information, please read Setting Up Self Assignment. Enabling this feature will display the following additional settings:

- Campaign Sender Invite Link: This link can be enabled or disabled before or after launching. When used, the campaign sender invite link adds the user as a sender to a campaign. It will only work for users who have already joined your account. The invite link URL will appear after launching the campaign.
- QuickSend: QuickSend is enabled by default when this feature is available. Read more about this in our guide QuickSend Information for Admins.
Recommended Replies
Recommended replies let you create reusable message templates for common questions, so senders can reply quickly and keep their messages consistent across your campaign. Use this step to set up the replies your team is most likely to need while texting. Read more about Recommended Replies in our guide: Recommended Replies.

The Replies page includes the following elements:
- All Replies: Shows the list of recommended replies that have been created and saved for the campaign.
- Add Reply: Click + Add Reply to create a new recommended reply with a title and message text. You can also add variables to personalize the message.
- Title: Enter a short, descriptive title so senders can quickly choose the correct reply.
- Variables: Use the Variables menu to insert variable data (such as names or custom fields) into your recommended reply. For more about variables, see our guide Using ThruText Custom Fields.
- Add Trackable Link: Add a trackable link to your reply so you can see who clicks the link. For more information, see our guide Trackable Links.
- Message Text: Write the text of the recommended reply that senders will send to contacts.
- Segment Length: Review the approximate segment count for the message. A recommended reply can be up to 9 SMS segments. For more details on segments and character limits, see the Initial Message section above.
- Message Preview: View a preview of how the recommended reply will appear when it is sent.
Edit or Remove a Recommended Reply
- Click Edit next to a reply to update its title or message text.
- Click Delete to remove a reply from the campaign.
- After you add, edit, delete, or reorder replies, click Save & Next to save your changes.
Survey Questions
Survey questions let you capture data from your conversations. For more examples and best practices, see our Survey Questions guide.

The Surveys page includes the following parts:
- Create New Question: Click this to add a new survey question to your campaign
- New Question: Add a new survey question that will be unique to your campaign
- Global: Global survey questions are created for your account, and can be added to any campaigns quickly and easily.
- Survey Type: Choose the format for your question. You can select: Yes/No, Multiple Choice, FreeForm, or Checkbox questions.
- VAN and ActionKit Survey Questions: If you use VAN or ActionKit and have mapped the appropriate fields in your targeting, you can import survey questions directly from those tools instead of recreating them in ThruText. This keeps your responses aligned with your external database.
- Question: Craft the survey question you want asked of contacts.
- Add Question: Select this button to add the survey question to the campaign.
Automations
Create Automations to have automated responses sent based on your specified keyword-initiated triggers. Check out our Automations guide for full details.

- Name: Add a new for your automation.
- Keywords: Add a single keyword or multiple comma separated keywords.
- Actions: Choose the recommended reply to associate with the automation.
- Cancel: Cancel the automation.
- Save: Save the automation.
- Add Automation: Add a new automation.
Review
Review your campaign details before launching:

During the review stage of campaign creation, you should double-check the details of the campaign to make sure everything looks as expected.
- Clone: Use this button to create a campaign clone. Please review our guide Cloning a ThruText Campaign for more details on this process.
- Delete: The button will delete your draft campaign. It will not be recoverable.
- Edit: Click the Edit button within each card section to make any changes. You can also collapse sections by clicking the down arrow next to each section title.
- Bulk Send Now: Immediately begin sending all initial text messages from a draft campaign review page.
- Schedule Bulk Send: Schedule a time to send all initial text messages from a draft campaign review page.
- Launch Campaign: Once your campaign review is complete, scroll to the bottom of the Review page and click the Launch Campaign button.
At the top of the Review page, you will see the status of your campaign change from Draft to Launching and then to Active. When a campaign becomes Active, the system will notify any senders added during the Senders step via email that they now have an assignment
Launching Troubleshooting
When launching a ThruText campaign, you may encounter errors that prevent your campaign from going live. These errors usually relate to provisioning, phone number availability or missing information.
U.S. Campaign Provisioning Time
In some cases, provisioning takes less than 10 minutes, but on busy weekdays it can take as long as multiple hours. While the phone number is provisioning, it cannot be used to send messages. You can refer to the Provisioning flags to check if their phone number has completed provisioning.
- Dedicated numbers cannot be added to a campaign during the number provisioning process. Once the provisioning has been completed, they are available in the Dedicated Phone number drop-down. For more information on provisioning and dedicated numbers, review our guide, Dedicated Phone Numbers for US Accounts - Section: What is Phone Number Provisioning?
- For single-use numbers, the campaign will remain in the Launching state until it has finished provisioning. Launching campaigns can be found on the draft page. After the process has been completed, the campaign will then become active.
Not Enough Phone Numbers
You’ll receive a Not enough phone numbers error occurs when the area codes you've selected do not have enough available phone numbers when attempting to launch:

Phone number availability changes frequently based on demand. To avoid this error:
- Select up to three area codes for your campaign.
- Broader selections like entire states (e.g., Illinois (All)) or US (All) for a larger pool of numbers).
After making new selections, be sure to click Launch again.
Number Limit Error
Each 10DLC use case can only support up to 49 phone numbers. If you've reached this limit you may receive an apportionment error when attempting to launch. To correct this error, you can do the following:
- Archive one or more active campaigns to free up your account's capacity.
- Then relaunch your campaign
Missing Fields
If any required fields are left blank when creating your campaign, you will see an error when clicking launch:

Double-check for any unfilled required fields across the seven steps and fill them in. Once complete, you can to reclick launch to create an active campaign.
Important Notes
- Please note Bulk Send and Scheduled Send are not enabled by default, but are available to eligible accounts. Please reach out to support@getthru.io to request the feature. For more information on these options review our guide, Sending Method Information for Admins.
- If your team is interested in setting up campaigns that target contacts outside of your account's country (US, UK, or CA), you'll need to do so under a separate account. Connect with us at support@getthru.io for more information.
- For important details on launching campaigns for the CA or UK, please review our guides Campaign Launching Details for Canada Accounts and Campaign Creation Details for UK Accounts.
- For a walk-through of launching a ThruText campaign, please check out our video How to Launch a Campaign.
Reach out to support@getthru.io if you have any questions.