
Getting Started With Group Creation
Groups are contact lists that you use to build the audience for your ThruText and ThruTalk campaigns. Each group contains the contacts you want to reach, and you can use the same group across multiple campaigns.
You can create a group by uploading a CSV file or importing a saved list from VAN. This guide walks you through creating a group from a CSV file, including preparing your contact list, mapping fields, and reviewing your group after uploading.
To create a group from VAN, see our Creating a Group from a VAN Imported List guide.
Prefer a video? Check out our video tutorial: How to Create a Group (GetThru Video).
Group Upload updates shown in this guide are Coming Soon!
TABLE OF CONTENTS
- Before Uploading
- Phone Number Formatting
- How to Upload a Group
- After Creating Your Group
- Troubleshooting Upload Issues
Before Uploading
If you're uploading contacts from a CSV, make sure your file meets the following requirements.
- Use CSV format: Your contact list must be a CSV file. If you're working in Excel or Google Sheets, export your spreadsheet as a CSV before uploading.
- Include a header row: Include a header row identifying the data in each column, such as first_name, last_name, and phone.
- Required Fields: Each contact must have a first name, last name, and phone number. Contacts missing any of these values will be excluded from the group.
- Group Size: Each group can contain up to 150,000 contacts.
- File Size: CSV files cannot exceed 45 MB. Files near this limit may fail to process.
- File Formatting: Line breaks within cells or non-ASCII characters can interfere with processing your CSV.
Phone Number Formatting
GetThru accepts common phone number formatting, including spaces, parentheses, dashes, and plus signs. However, phone numbers containing letters will cause errors.
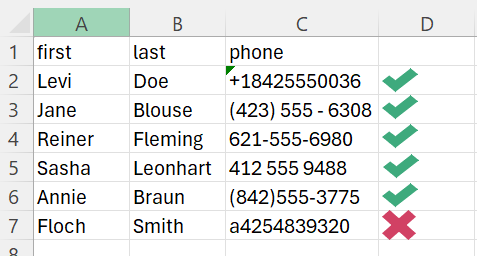
Phone numbers should follow the requirements for the country you're uploading contacts for:
- United States and Canada: 10 digits (234-456-2893), or 11 digits when country code (+1) is used (+1 234 567 8910)
- United Kingdom: 10 digits (7700 900123), or 12 when the country code (+44) is added (e.g. +44 7700 900123
How to Upload a Group
To start uploading a group, open the Group Upload Wizard using either of the following options:
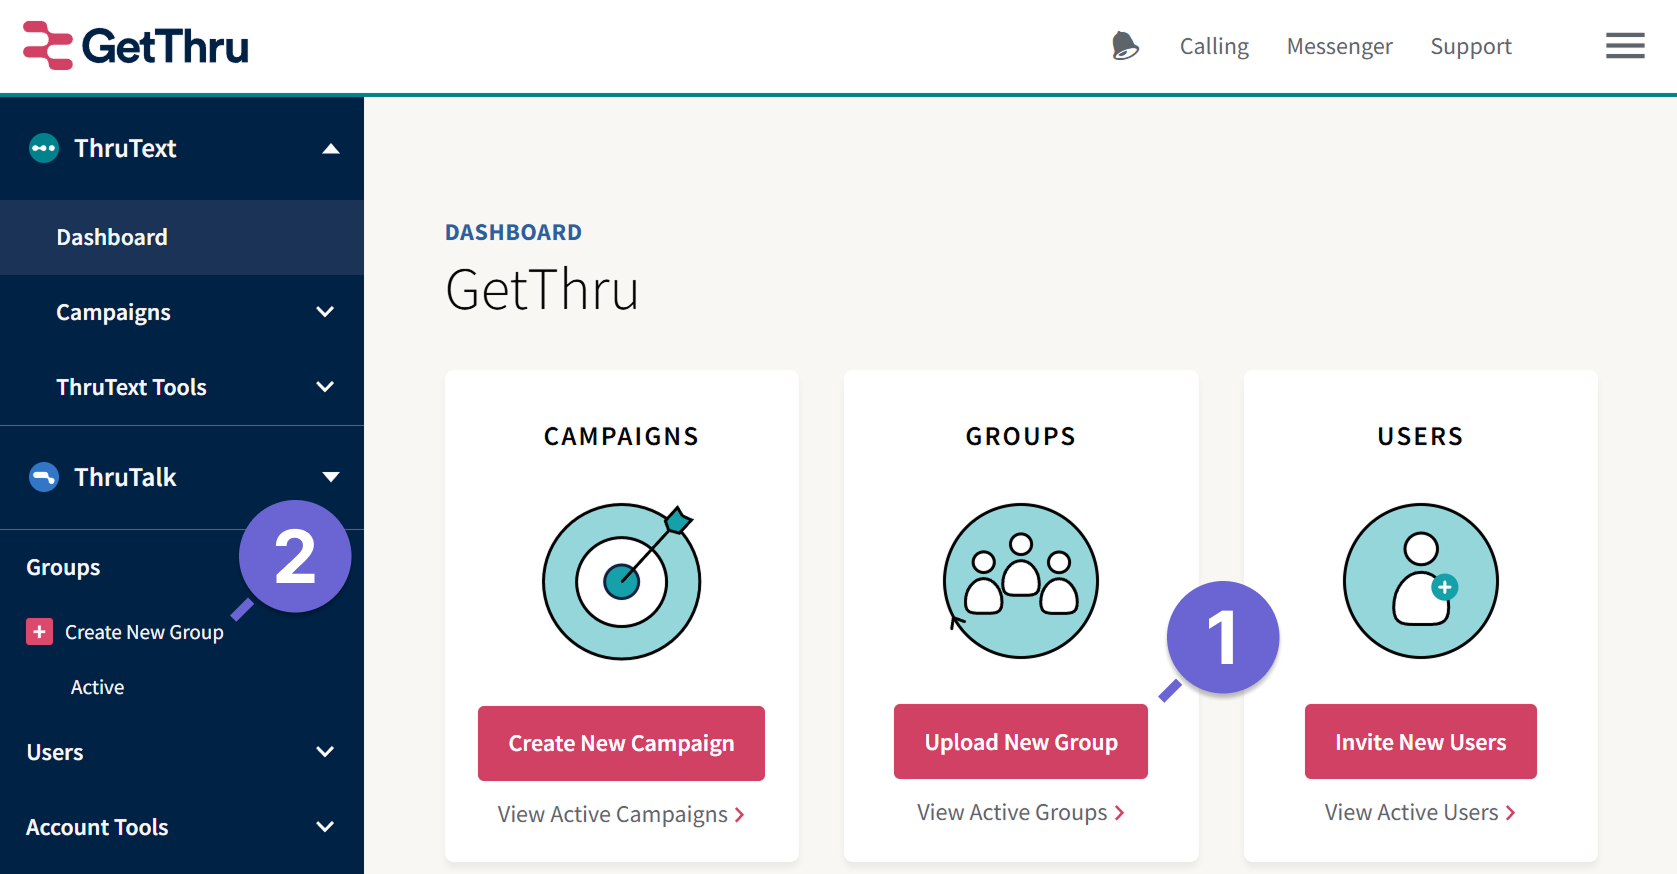
- Click Upload New Group from the Dashboard.
- Or, in the left side navigation menu, expand Groups and click Create New Group.
The Group Upload Wizard will guide you through three steps: File Selection, Field Mapping, and Review.
Step 1: File Selection
First, choose how you'd like to add contacts to your group.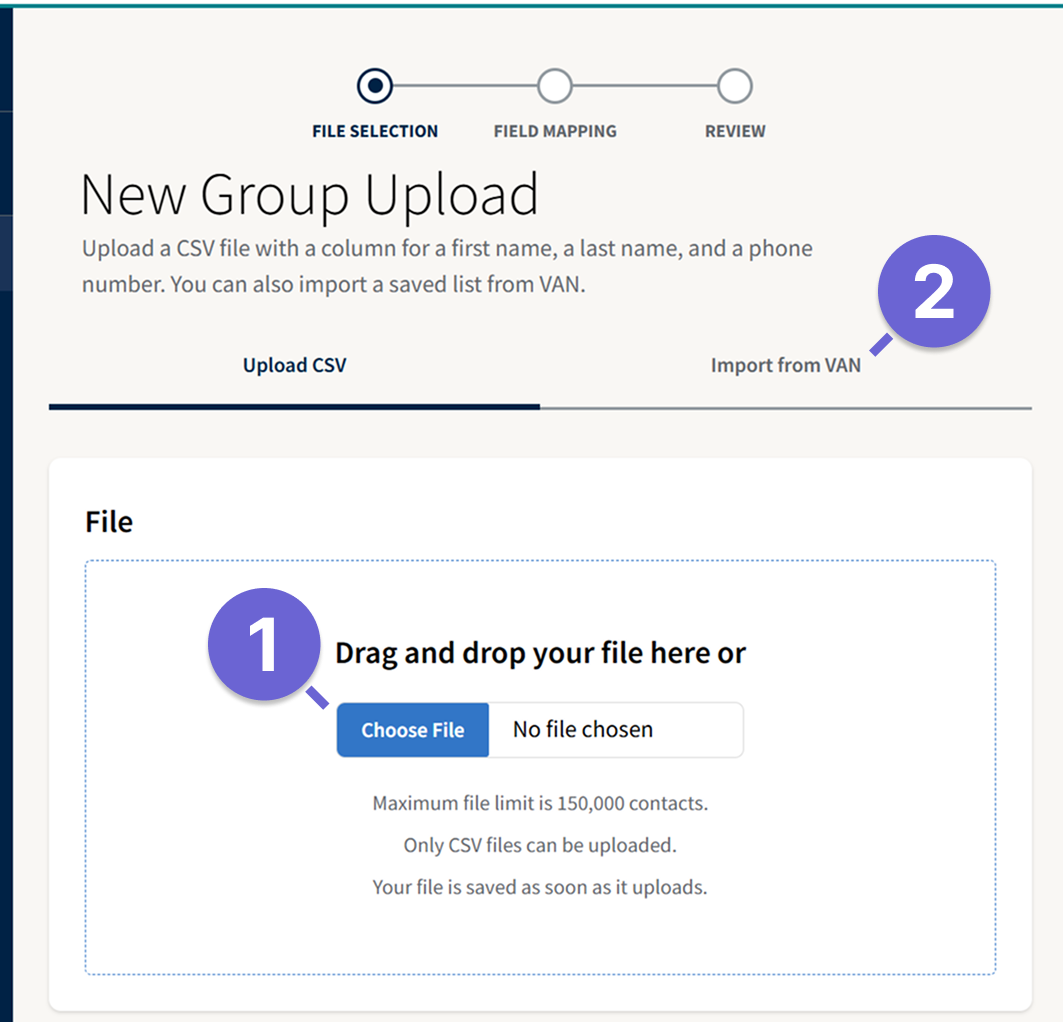
- Upload CSV: Click Choose File to select a CSV from your computer, or drag and drop it into the upload area.
- Import from VAN: If your account has a VAN integration, select Import from VAN to choose a saved VAN list. For more information, read our guide, Creating a Group from a VAN Imported List.
After selecting a CSV, the wizard will display its details.
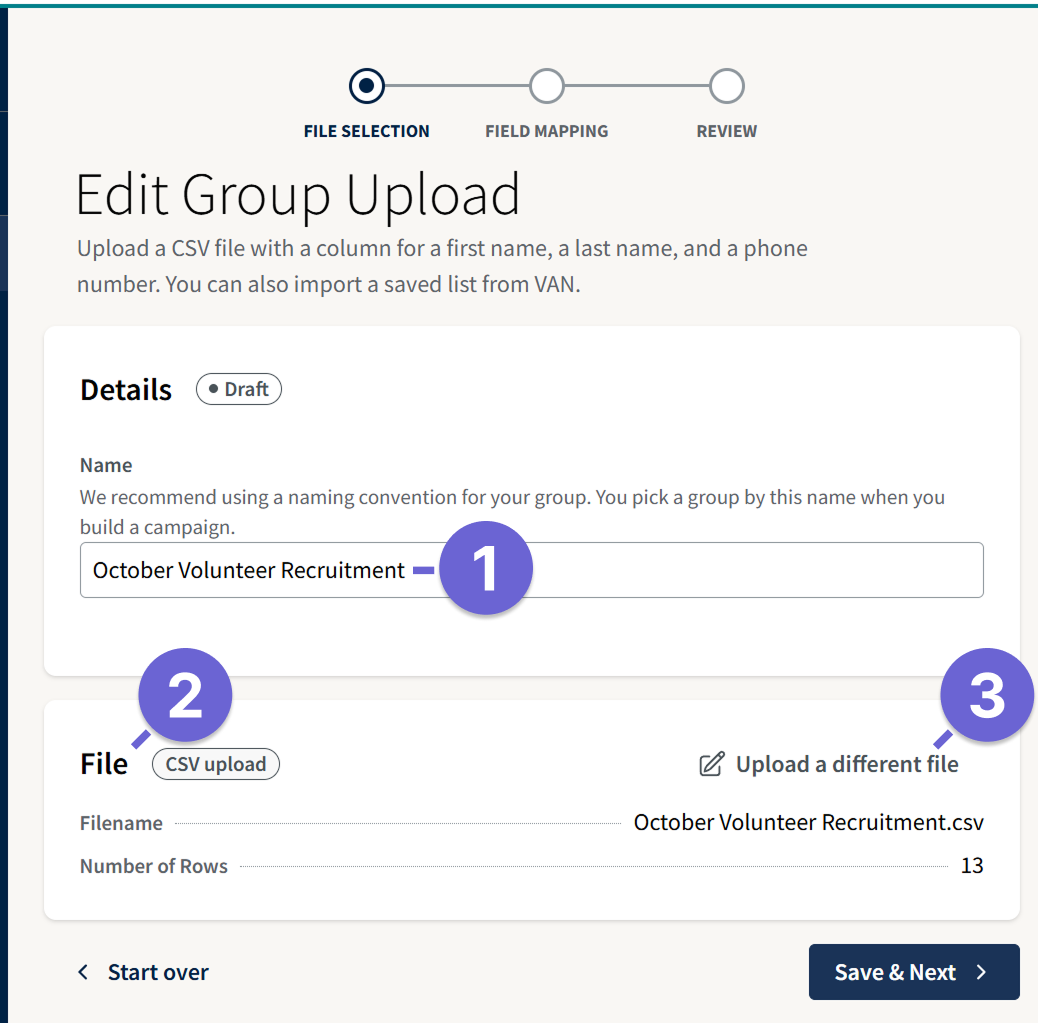
- Name: Your group name is automatically generated from your CSV filename. You can change it to a more descriptive name that will help you identify the group later.
- File: Review the filename and the number of rows detected in your CSV.
- Upload a different file: Click here to replace your CSV with another file.
Once you've reviewed these details, click Save & Next to continue.
Step 2: Field Mapping
Next, you'll map the columns in your CSV to the corresponding fields in GetThru.
Required Fields
Every contact must have a first name, last name, and phone number. GetThru automatically attempts to match these fields to the corresponding columns in your CSV based on their headers.
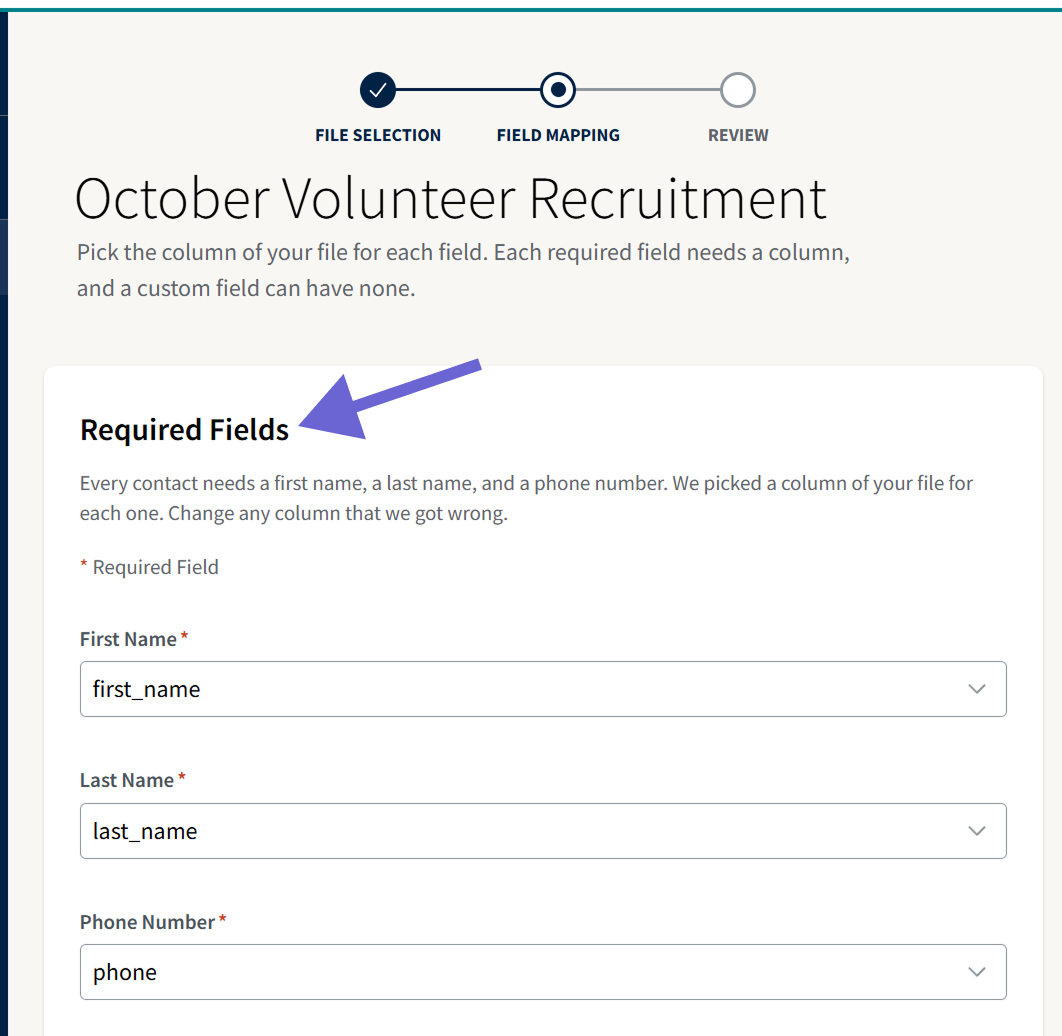
Review the selections to make sure each required field is mapped correctly. If a field is mapped incorrectly or wasn't automatically selected, use the dropdown menu to choose the appropriate column.
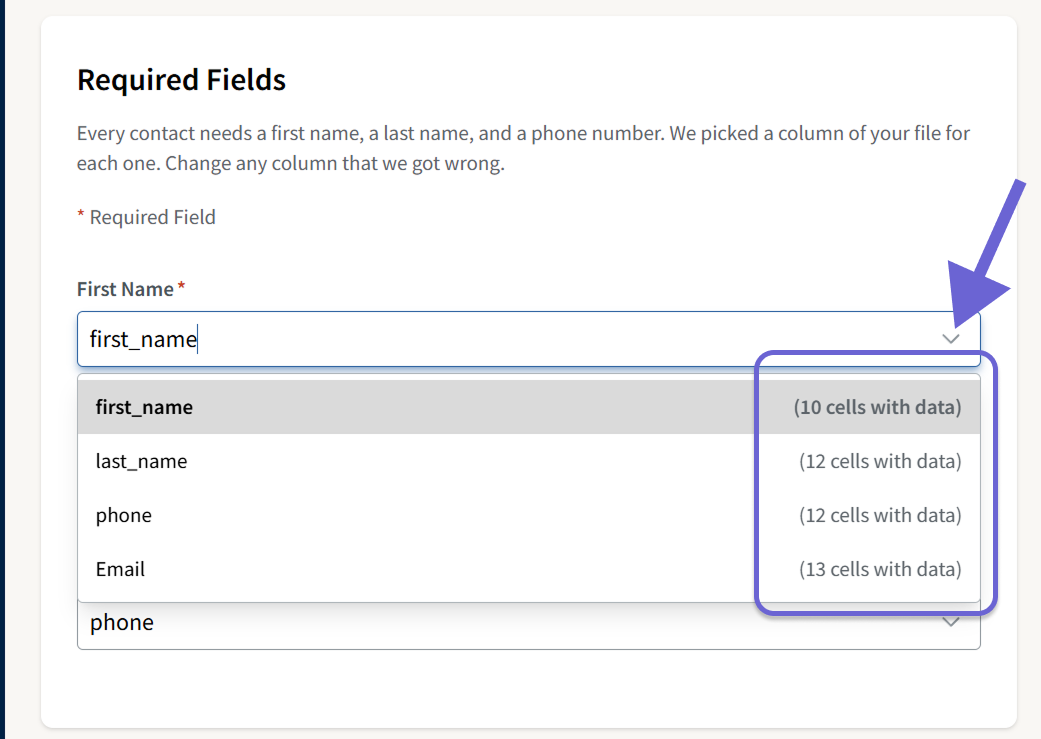
Each dropdown option displays the number of cells containing data in that column. This can help you identify missing information before creating your group.
In the example above, the first_name column contains data in 10 cells, while the CSV contains 13 rows of contact data. Contacts missing required information will be excluded from the group.
Custom Fields
Below the required fields, you'll find the custom fields configured in your account. Custom fields allow you to include additional information about your contacts, such as email addresses, VAN IDs, or other data.
GetThru automatically attempts to match custom fields to your CSV columns by name. Review the selections and adjust any mappings as needed.
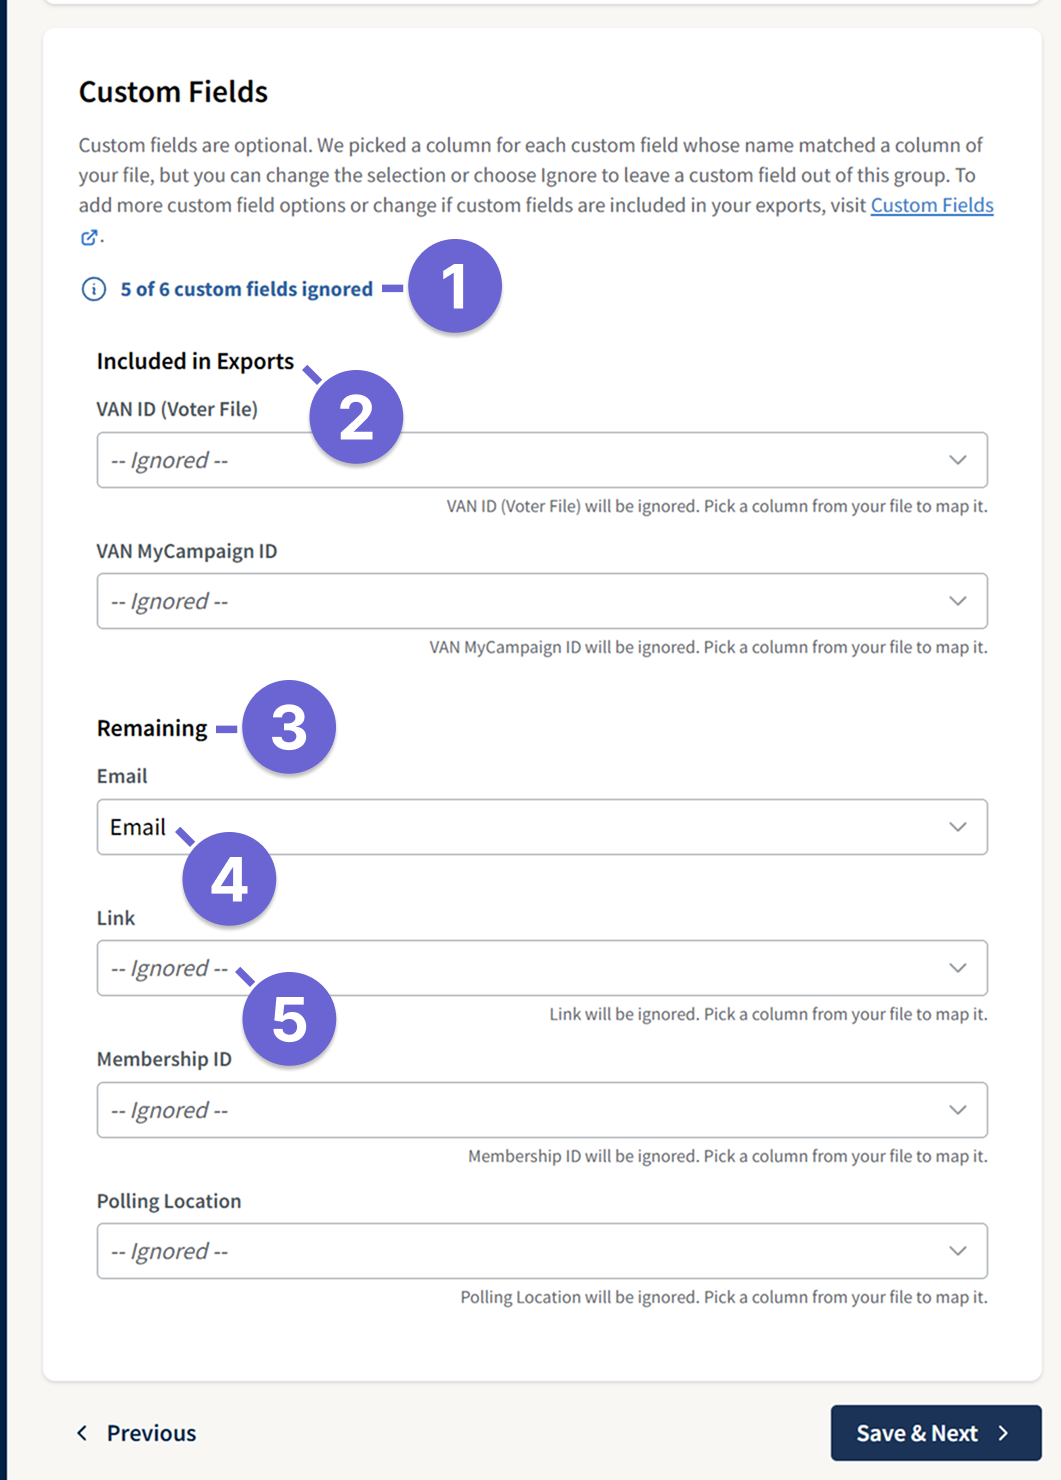
- Custom Fields Ignored: Shows how many custom fields will not be mapped to your group. In this example, five of the six available custom fields are being ignored.
- Included in Exports: Custom fields configured in your account to appear in exports when mapped.
- Remaining: Other custom fields available in your account.
- Mapped Fields: Select the corresponding CSV column to include its data in your group. In this example, the Email column is mapped to the Email custom field.
- Ignored Fields: Fields set to Ignored will not be mapped to your group. Select a CSV column from the dropdown if you want to include that field.
NOTE - Custom fields must already exist in your account before they can be mapped during the upload process. To create custom fields or change which fields are included in exports, see our guide, Custom Fields - Personalization and Integrations.
If you're uploading a VAN list from a CSV, make sure your VAN IDs are mapped correctly so your data can sync back to VAN.
Once you've reviewed your custom field mappings, click Save & Next to continue.
Step 3: Review
Before creating your group, review the file details and field mappings to make sure everything is correct.
The Review page shows your selected file and how its columns will be mapped to GetThru fields.
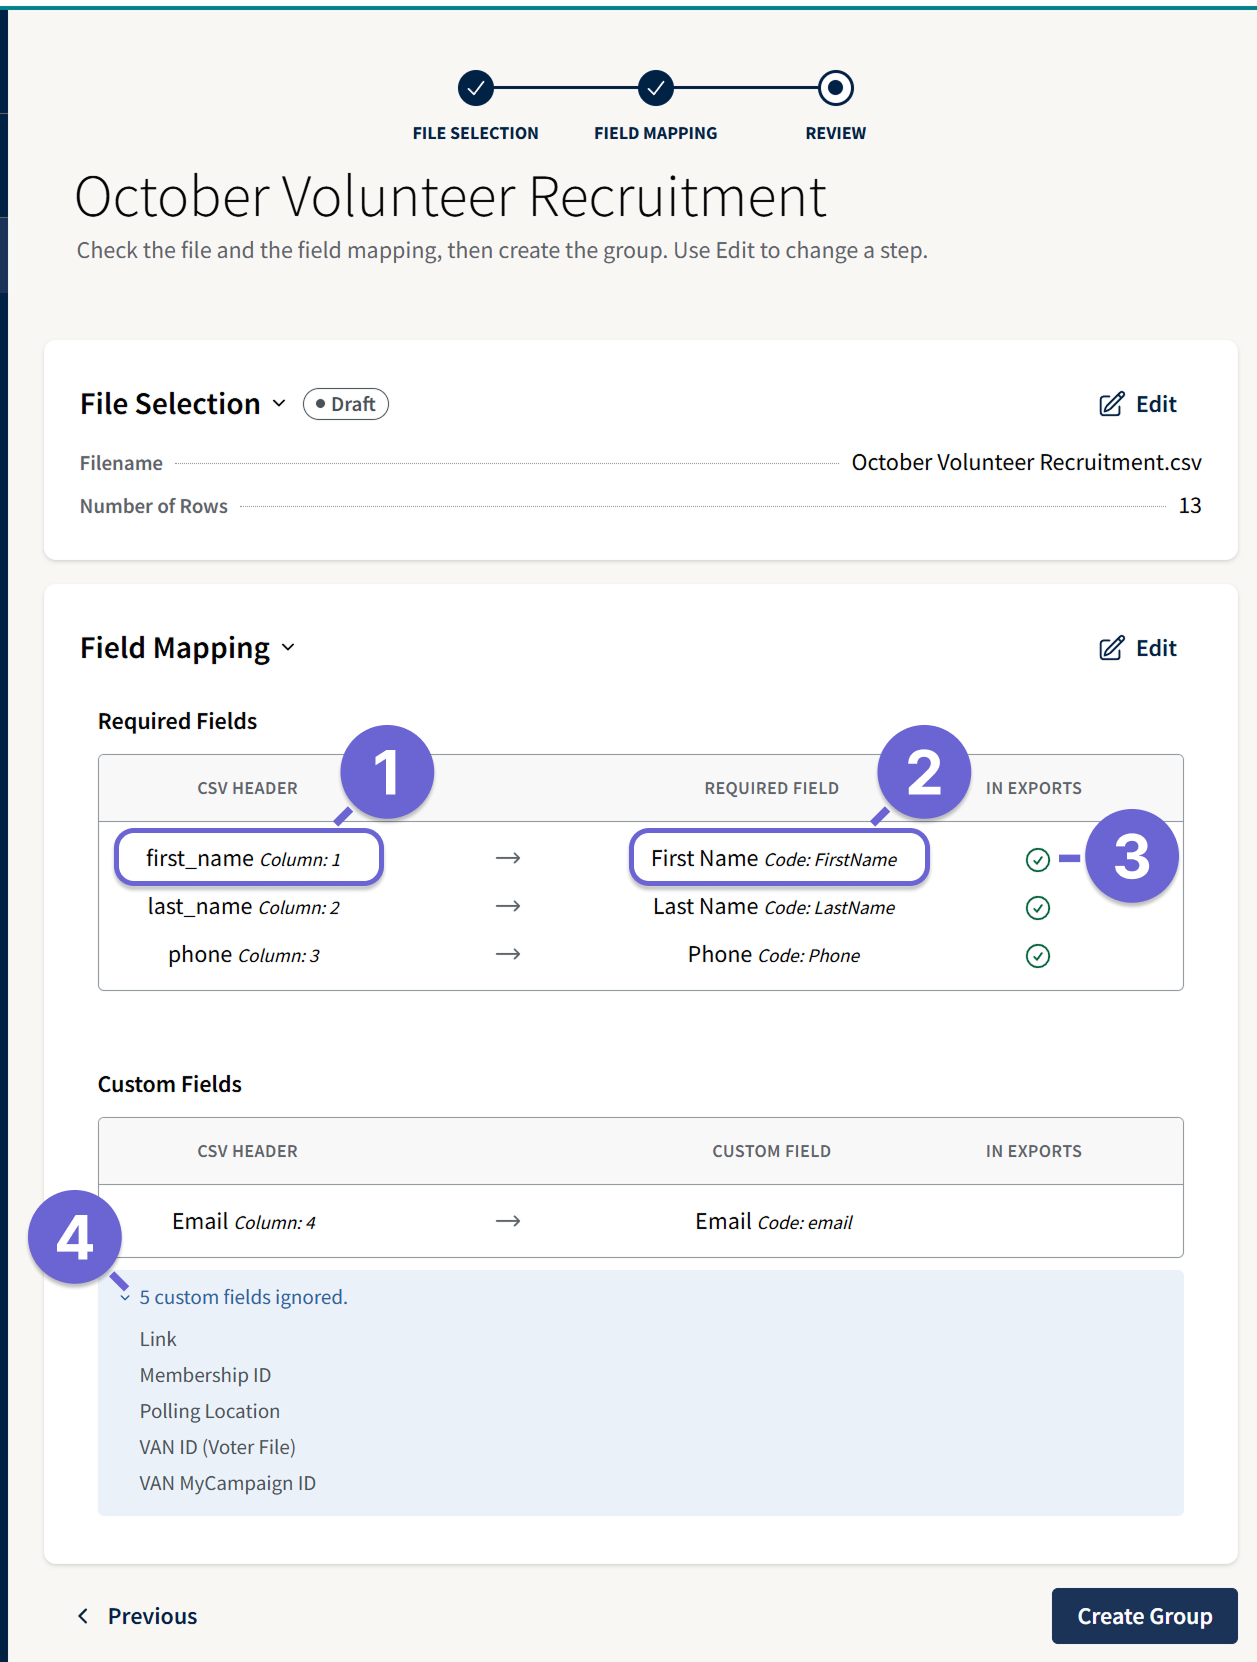
- CSV Header: Shows which column from your uploaded CSV was selected.
- Required Field: Shows which GetThru field each CSV column is mapped to.
- In Exports: A green checkmark indicates that the mapped field will be included in exports.
- Ignored Custom Fields: Lists the custom fields that were not mapped and will not be included in your group.
If you need to make changes, click Edit to return to that step. Once you've confirmed that everything is correct, click Create Group.
Important: After creating a group, you cannot add or remove contacts or change their field mappings. Make sure your information is correct before proceeding.
After Creating Your Group
After clicking Create Group, you'll be directed to the Group Details page, where you can monitor your upload's progress.
Your group status will appear as Uploading while your contacts are being processed and their phone numbers are being validated. Once your group status updates to Active, it has finished processing and is ready to use in ThruText and ThruTalk campaigns
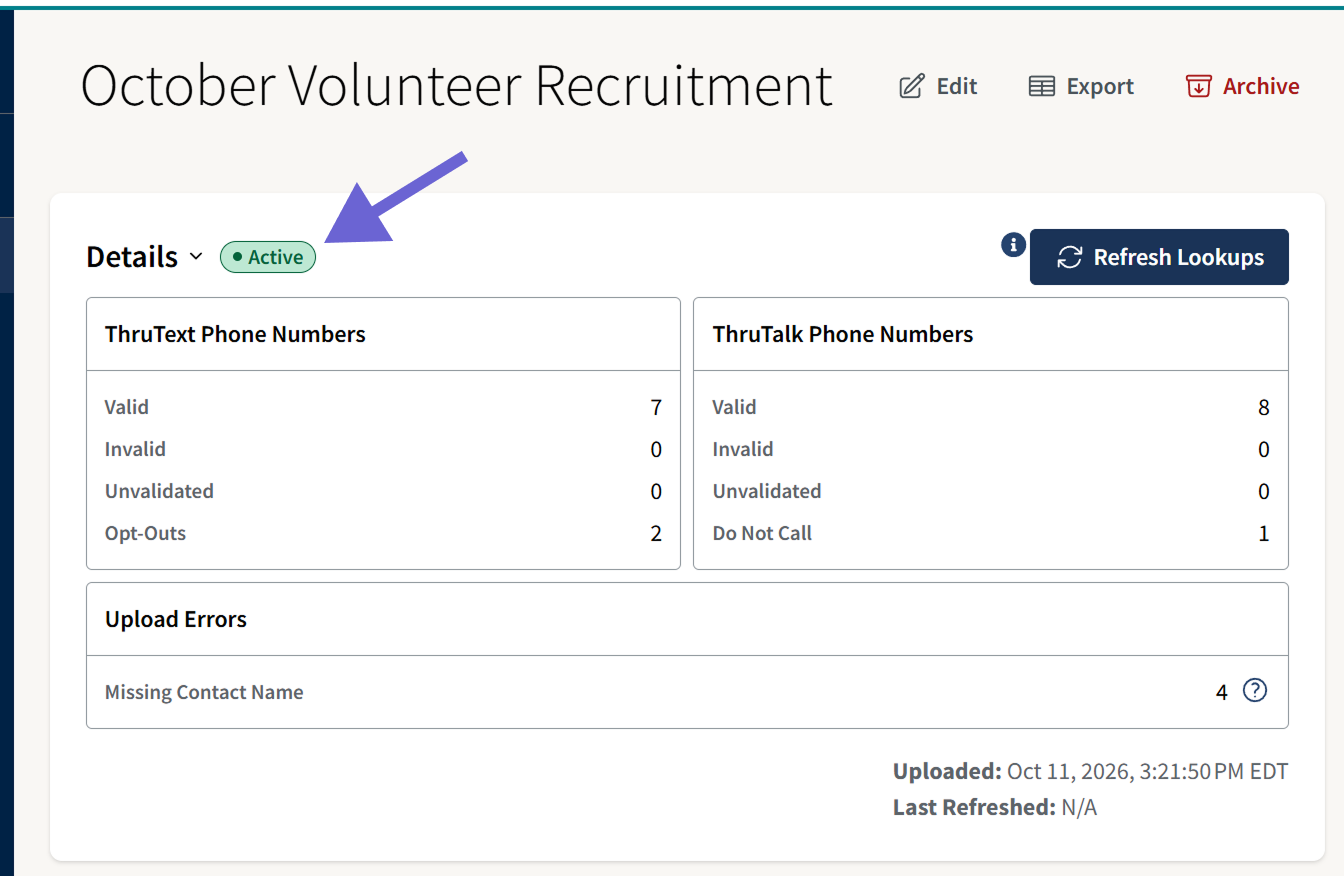
Once your group is Active, you can review the number of valid contacts along with any errors encountered during upload. For more information about validation results, upload errors, and managing your group, see our Group Details Page guide.
Troubleshooting Upload Issues
- Missing Contact Names: If your contact list is missing first or last names, you can use placeholders to prevent those contacts from being excluded during upload. For example, you could enter "Friend" or "First Name" as the first name. Keep in mind that if you use the first name variable in a ThruText message, the placeholder will appear in place of the contact's name.
- File is too large: If your file exceeds the upload limits, consider removing unnecessary columns or splitting your contacts into smaller files. You can add multiple groups to a single ThruTalk or ThruText campaign, for a total of 150,000 contacts per group or per campaign. See our guides for more information:
- Simultaneous uploads: You can upload up to three groups simultaneously. If you've reached this limit, wait for an existing upload to finish before starting another.
- File name too long: Long file names can prevent uploads; shorten and retry.
If your group takes longer than expected to process, or you're still experiencing issues after reviewing these suggestions, contact GetThru Support at support@getthru.io.