Admin Messenger and Conversation Reassignment
The Admin Messenger provides a place to view and reassign individual senders conversations in ThruText campaigns. From this page, you can ensure conversations are completed and information correctly logged. This helps maintain data quality and that contacts receive timely, accurate responses. This guide will detail the process for reviewing and reassigning individual conversations to keep your campaigns clean.
TABLE OF CONTENTS
Before Getting Started
Check out the Conversation Overview page for a campaign's conversation stats or to reassign conversations in bulk from one or multiple senders. That page provides the following counts:
- Total number of conversations
- Conversations not started
- Conversations needing replies
For details on that process, please check out our guide Conversations Overview Management and Reassignment and for a video walk-through on the process, please check out our How to Reassign Conversations tutorial.
Admin Messenger Overview
You can access the Admin Messenger by clicking on a sender first or last name within the Conversation Overview page.

This will take you to the Admin Messenger page where you can see each individual conversation for a sender and reassign, if needed. Reassigning individual conversations is helpful if you know a sender cannot complete their assignment or if a contact needs follow-up from a specific person.

Left-Side Bar: Filtering Assignment

The Admin Messenger includes four main tabs for filtering a sender's assignment:
- Initial Messages: This tab shows unsent initial messages. This tab is hidden if there are no unsent initial messages or the initial message window has closed.
- Responses: This tab includes conversations where contacts have replied. The following actions are available:
- Replying to messages.
- Recording survey data.
- Processing opt outs.
- Contacts that have not received a response yet will have a green dot next to their name.
- Follow-ups: If follow-up messages are active but unsent, those conversations appear here. The following actions are available:
- Sending replies.
- Recording survey data.
- Processing opt outs.
- Opt Outs: Displays all opted out conversations, whether processed manually or automatically. The following actions are available:
- Record survey data
- Opt contacts back in from the Opt In button in the top bar
- Search: A search field for searching for specific contacts by name is available from the Initial, Responses, Opt Outs, and Follow ups tabs.
- Sort: A sort option to filter by Needs Reply, Recent, or A to Z is available from the Responses and Opt Outs tabs.
Conversations with an initial message sent, no follow-up, and no reply will not appear in the Admin Messenger. Use a campaign export to view all conversations.
Top Yellow Bar: Viewing Assignments
 The yellow top bar confirms which sender’s assignment you're viewing. You can:
- Use the Viewing as: dropdown to switch users.
- Click on the sender's name for a sort drop-down.
- Senders will be listed in the sorting order last used on the Senders table on the Conversations Overview page. The following sort options will display:
- Search field to find a specific sender by name.
- Status: This shows if the sender is offline or online with the Messenger open.
- Clicking the Sender header sorts the senders by first name Z to A. Clicking it again will return the sorting order to first name A to Z.
- Unassigned is always listed at the top of the order.
- Clicking the Progress header will sort first by the highest total amount assigned to the sender (denominator), with a secondary sort order by the amount sent (numerator). Clicking the Progress header again would flip the order.
- Clicking Needs Reply will sort the senders by how many conversations the user has yet to reply to. Clicking the Needs Reply header again will flip the order.
- Senders will be listed in the sorting order last used on the Senders table on the Conversations Overview page. The following sort options will display:
- Click Next Sender to cycle through assignments in sort order.
- Use the Reassign drop-down to move conversations to another sender.
- Unassign All: Move all conversations from the sender to unassigned.
- Reassign Some: Move a specified number of conversations to other senders in the campaign.
- Reassign All: Move all conversations from the sender to other senders in the campaign.
For Reassign Some and Reassign All, you'll have the following options:
- Choose the conversation status of Not Started, Needs Reply, or Any.
- Choose to move all conversations from the sender to unassigned, to other specific sender names, or across all other senders in the campaign via distribute to all users.
Conversation View
The conversation view provides the conversation thread between a sender and contact.
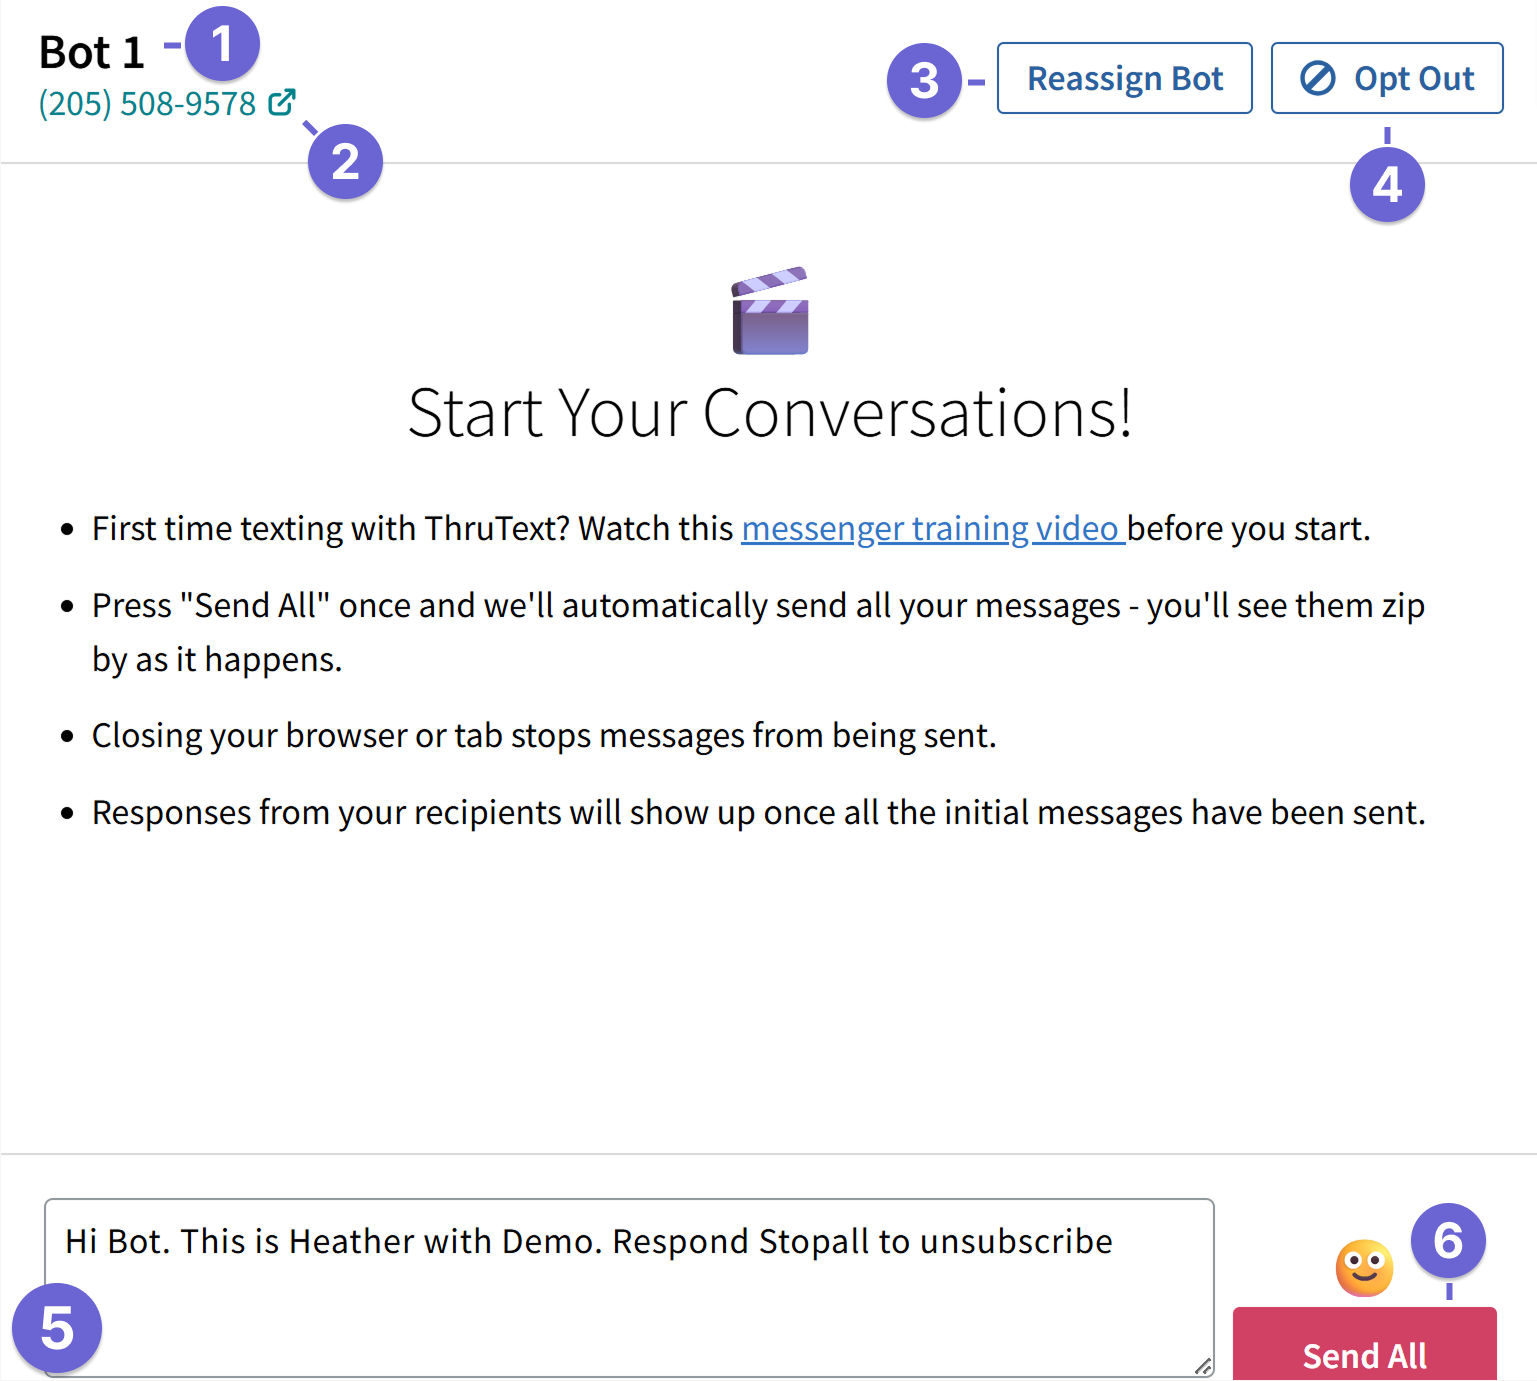
When viewing a conversation, the upper bar displays:
- Contact name
- Phone number
- The phone number links to the Phone Number Lookup page for the contact.
- The phone number display can be redacted upon sending a request to support@getthru.io.
- Reassign button to move the contact's conversation to a different sender or to unassigned.
- Opt Out or Opt In button, depending on the contact's current status.
- Auto and manual opt outs will display under the Opt Out tab.
- Message Box: The message box contains the message that will be sent to the contact.
- Send: You'll see a Send or Send All button to use for completing sending. Please check out our Sending Methods guide for more details.
Campaign Status
The conversation view will include a listing of the status for certain campaigns states.
- Paused or closed campaigns: Campaigns will have a Campaign is currently closed status.

Right-Side Bar: Assignment Details

The right side bar section includes three tabs:
- Survey: View and edit survey responses. To create survey questions, you'll need to add them at the Survey step before launch or via the active campaign's Survey tab after launch. Check out our Survey Questions guide for more details.
- Replies: View or use available campaign or global Recommended Replies. For details on how to create new or edit recommended replies, please check out our guide Recommended Replies.
- Info: View campaign name and creation details.
Reach out to support@getthru.io if you have any questions.